
Getting
Started
with
the OMB
Credit
Subsidy Calculator
Getting
Started with the OMB Credit Subsidy Calculator
I. Overview............................................................................................ 3
A. Starting the Program............................................................................................................................... 3
B. Loading Cash Flows................................................................................................................................. 4
C. Calculating a Subsidy............................................................................................................................... 4
D. Expanded Display and Output Options................................................................................................. 5
E. Explain Buttons and Tips........................................................................................................................ 9
II. Changing Options and Preferences................................ 10
A. General Preferences.............................................................................................................................. 11
B. Selecting Rates........................................................................................................................................ 12
III. Batch Preferences.................................................................... 16
A. Commands to print output.................................................................................................................... 16
B. Commands to save output from a single
run to a file...................................................................... 17
C. Commands to save output from multiple
runs to a file.................................................................. 18
D. Commands to save output in a
spreadsheet....................................................................................... 19
IV. Online Help.................................................................................... 20
I. Overview
The Credit Subsidy Calculator (formerly Credit Subsidy Model) represents a vast increase in power, speed and scope when compared to Version r.9 of the old software. Since the release of Version r.9 in 1994, the speed of computers has increased while the price has dramatically decreased. As a result, the new CSC has many new powerful features that could not be incorporated just a few years ago.
In addition, virtually all agencies have standardized on some flavor of the Microsoft Windows operating system. As a result, the new software runs solely on the Windows platform. Basing the Calculator on Windows allows the user several advantages including:
a. Easy-to-use graphical interface
b. On-line help
c. Pasting results directly into spreadsheet or word-processing software
d. Multi-tasking (run CSC and spreadsheet simultaneously)
A. Starting the Program
From Windows simply click the start menu then click the Credit Subsidy Calculator icon in the Credit Subsidy Calculator group of the “Programs” menu. Upon opening the calculator you will see a message very similar to the following:

If you do not wish to see this message in the future, click the check box next to the text that reads “Show this message…” then click “OK.”
B. Loading Cash Flows
The calculator is fully compatible with all of your old cash flow spreadsheets. To open a spreadsheet click “File, Open...,” then select the file you wish to open.
Your screen will now look similar to this:
You will notice that this initial screen provides quite a
bit of information about your cash flows.
Besides reproducing the cash flows from your spreadsheet, this screen displays: the spreadsheet name and location, the
range name and location, the method used to associate cash flow observations
with disbursement periods, the type of loan, and dates and times. The cash flow titles are standardized and
are followed by the frequency, timing and time period of the flows. To get back to this screen from any other
screen, click on the CFs button.
If the CSC encounters unusual patterns in the cash flows (such as negative interest) or undefined keywords, the CSC will open to a message/warning page. Warnings generally will not stop the calculator from calculating a subsidy. They do, however, indicate that the subsidy generated by the calculator may be inaccurate. This message page can be viewed at any time by clicking the Msg button.
C. Calculating a Subsidy
![]()
To quickly calculate a subsidy you need to click on the run subsidy button . Alternatively you can click “Actions, Calculate the subsidy” on the tool bar. Your output should resemble the following screen:
The “Subsidy and components” display includes header lines that identify information specific to your cash flow spreadsheet and the manner in which the subsidy was calculated. The subsidy output section is similar to that of older versions of the calculator with the total subsidy and its four subsidy components arranged by cohort year. Footnotes list codes specific to a calculation of the single effective rate.
D. Expanded Display and Output Options
The CSC gives you the option to produce more information pertaining to the calculation of the subsidy. The following window will be displayed when you choose “Actions, Preferences, Output preferences” from the toolbar:
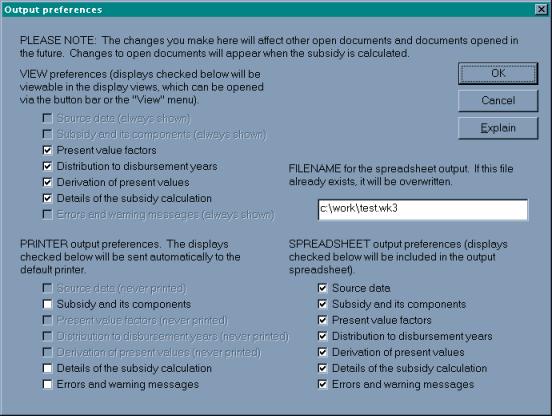
The available view options each have toggle boxes that allow you to select and deselect the views that will be created when you calculate the subsidy. Selecting all of the views will provide you with a much greater level of detail, however, your calculation time may be increased (no more than a few seconds on most machines).
From this window you also have the option to direct output to a spreadsheet or to your printer. To send output directly to a spreadsheet file simply type in a path and a name in the FILENAME box. Then select the displays that you would like sent to the file. A different “sheet” within the spreadsheet will represent each display. Likewise, to send information directly to your printer, check the toggle boxes under PRINTER output preferences (depending on the size of your cash flows this option may consume substantial amounts of paper). If you have changed the output preferences you should click the “OK” button and re-run the subsidy.
When all of the view options are selected and the subsidy is recalculated, four new buttons will be enabled: PVFs, DDP, NPV, and Calc (in addition to the CFs, SUB and Msg buttons already enabled).
Clicking on the PVFs button will switch to a view displaying the present value factors used to discount the cash flows. Factors for 100 years of cash flows are displayed in three columns representing the beginning, middle and end of the specified period. Although factors are calculated for annual, semi-annual, quarterly, and monthly cash flows, the window cannot display all of the factors. To view monthly and quarterly factors you must specify an output spreadsheet and view them through your spreadsheet software (“PV factors” sheet). When using the CSC to calculate reestimates, this display will also present information on the calculation of the disbursement weighted average interest rate.
Pressing the DDP button provides a display of the distribution of cash flows to specific disbursement periods. This sheet can be quite useful in understanding how the calculator disaggregates cash flow data and associates that data with a given disbursement period. If there is only one disbursement period, all of the cash flow data is associated with that period. The DDP view will display the following message “(No input lines were distributed by disbursement period).”
By clicking on the NPV button you will see a display showing the calculation of present value amounts, by disbursement period, for each type of cash flow contained in the range. For each cash flow element, the calculator displays the associated present value factor, the discounted value and the sum of the discounted values (present value).
The final display can be reached by clicking the Calc button. This display shows the detail associated with the computation of the individual subsidy components.
Although not shown in the view above, the calculator has additional information for the “Fee component” as well as “All other components.” Had this example contained multiple cohorts, additional banks of data would have been generated for each additional cohort year.
E. Explain Buttons and Tips
![]() Each
dialog box in the calculator contains an “Explain” button. These buttons are designed to provide you
with quick and concise explanations or definitions of the topics addressed in
the dialog box. For instance, had you
clicked on the explain button shown in the Output preferences dialog box (see section
II. D.), you would have seen the following “Tips” window:
Each
dialog box in the calculator contains an “Explain” button. These buttons are designed to provide you
with quick and concise explanations or definitions of the topics addressed in
the dialog box. For instance, had you
clicked on the explain button shown in the Output preferences dialog box (see section
II. D.), you would have seen the following “Tips” window:
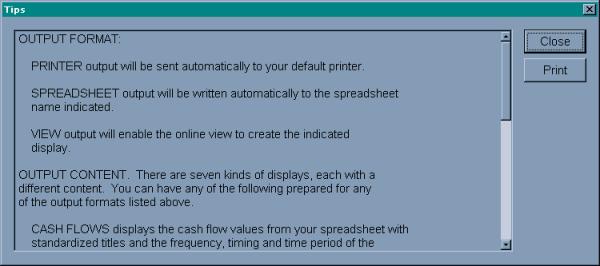
This tips window will overlay all of the main CSC views until closed. All of the information contained in the window can be copied into a document by highlighting the text and copying it through a “right” click of your mouse button. Alternatively, the text can be sent directly to your printer by clicking the print button.
Additional Tips windows can be found by clicking on Tips in the menu bar.
This method gives you direct access to Tips windows covering several different topics:
Views information on the seven view windows and their limitations.
Checklist items to consider prior to loading your cash flow spreadsheet.
Explain explanations of:
· Kinds of interest rates
· Process
II. Changing Options and Preferences
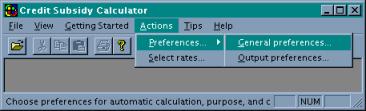
The CSC has optional features that can be accessed by clicking “Actions” on the toolbar (see below). Some options will allow you to change operational features such as output and display (see section II. D.). Other options enable you to perform alternative analyses on your cash flows such as using alternative interest rate assumptions or calculating the borrower’s interest rate that will provide a financing subsidy of zero. The following sections will attempt to familiarize you with the option menus and their uses.
A. General Preferences
The general preferences dialog box allows you to enable several important features of the CSC. One of the most important features is the check box for the single effective rate. When this box is checked, the CSC will calculate the single effective rate (flat rate) that generates the same subsidy as the basket-of-zeros discounting method.
To calculate the single effective rate, simply click the check box, hit “OK,” and re-calculate the subsidy. The single effective rate will be shown in the Subsidy window along with the total subsidy and its components.
There are three check boxes in addition to the “single effective rate” check box. The first check box will allow for the automatic calculation of the subsidy when a new cash flow spreadsheet is opened (file-open). The second check box commands the CSC to treat the first year of cash flows as the Budget year instead of the Current year. For example, if you are calculating a subsidy for the FY2002 Budget, the CSC will assume that the first column of data is associated with the current year (2001). However, if you put a check in the second box, the CSC will assume the first set of cash flows now represent 2002 (the budget year). The final check box sends all copied text to the clipboard in spreadsheet format. You should enable this option if your spreadsheet software cannot differentiate between text and cell formats (this problem may occur when you copy text/values in a view and paste them into a spreadsheet).
Below the first three toggle boxes, you will find an input box for the default budget year. If a budget year is not stated in the spreadsheet, the value listed in the input box will be used. Additionally, if the “Purpose” is set to “budget formulation,” the CSC will use this value to pick the appropriate interest rate assumptions. You will also see a “Default range names” box. This box contains the name of the range that the CSC will search for upon opening a spreadsheet. If no ranges with the default name are found, the CSC will look for “any” range in the file. If multiple ranges are found, the CSC will prompt you to choose the one containing your cash flows.
The “Purpose” can be set to “Budget formulation”, “Reestimate,” or “Analysis.” If the calculator is set to Budget formulation, the calculator will calculate a subsidy based on the current budget year interest assumptions. If the purpose is set to Reestimate, the CSC will calculate a subsidy based on actual and Budget assumption interest rates for the cohort, or on an interest rate entered into the cash flow spreadsheet. If the purpose is set to Analysis, you may use alternate budget assumptions. If spreadsheet commands conflict with CSC options, the “Conflict resolution” settings tell the CSC which settings should take precedence.
B. Selecting Rates
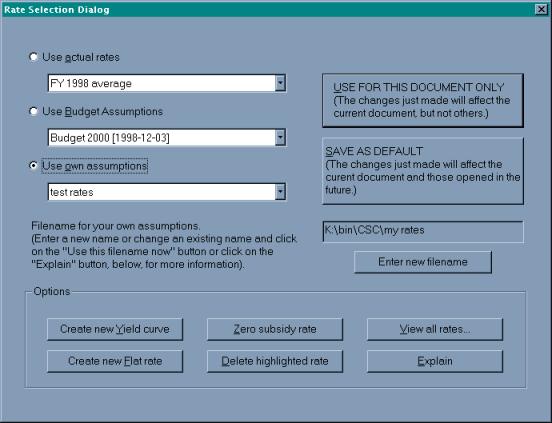
The CSC will allow you to see how changes in interest rate assumptions can change the calculated subsidy rate. However, prior to analyzing the effect of alternative rates, you must set the “Purpose” to “Analysis” (see “General preferences” above). If the purpose is set to “Budget,” the CSC will use budget rates regardless of any changes you make in the rate selection dialog box. To get to the rate selection dialog box you must click “Actions, Select rates...”
The rate selection dialog includes three check boxes. Clicking the “Use actual rates” box instructs the CSC to use historical actual averages. Presently, the calculator includes actual averages for FY 1992 through FY 2000. To use actual rates for FY 1996 you would click the menu button and select “FY 1996 average” from the drop down menu. At this point you can decide to use these rates as the default rates (used for all further calculations) by clicking “SAVE AS DEFAULT” or you can apply these rates to your current set of cash flows (but not others) by clicking “USE FOR THIS DOCUMENT ONLY.” When you re-run the subsidy, the calculation will be based on the average rates for FY 1996.
You may also calculate the subsidy using past budget assumptions. Simply click the “Use Budget Assumptions” check box, select a set of rates (CSC currently includes Budget assumptions for 1992 through 2002), and re-run the subsidy[1].
Menu Button
![]()
The final toggle box allows you to use rate assumptions that you create. However, before you create any rates you must click the “Enter new filename” button and provide a file name for the CSC to store the rates you create. You can then create a set of rates in one of two ways.
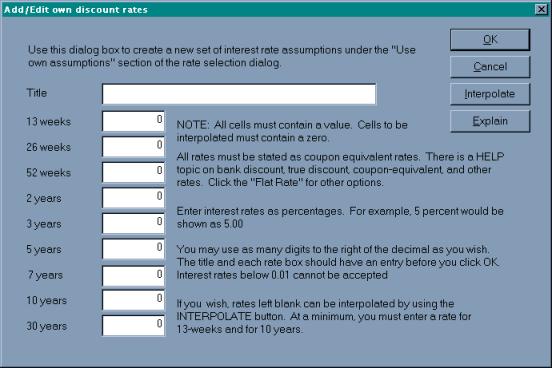
By clicking the “Create new Yield curve” button you will see the “Add/Edit own discount rates” dialog box. The box allows you to enter up to nine points on a standard published yield curve. Actual points can be found through the Federal Reserve or financial publications such as The Wall Street Journal. If you do not wish to enter all nine points, you can enter the 13 week and 10 year rates and allow the calculator to interpolate the remaining values. You do this by clicking the “Interpolate” button. To use the rates you create, you must give them a title, click “OK,” and select them under “Use own assumptions” (see previous screen).
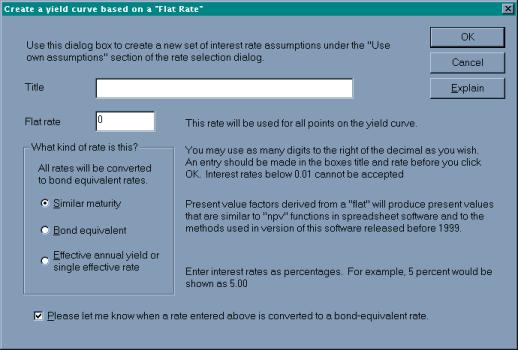
The other way to create a set of rates is to supply a file name and click
“Create new flat rate” in the rate selection dialog box. The dialog that appears will allow you to
create a “flat” yield curve by providing a single interest rate. The single rate can be stated in terms of an
effective annual yield, bond equivalent rate, or similar maturity rate. If the rate is entered as an effective
annual yield or similar maturity terms, the calculator will automatically
convert them to bond equivalent terms.
As with the yield curve example, you must provide a title before you
click “OK.”
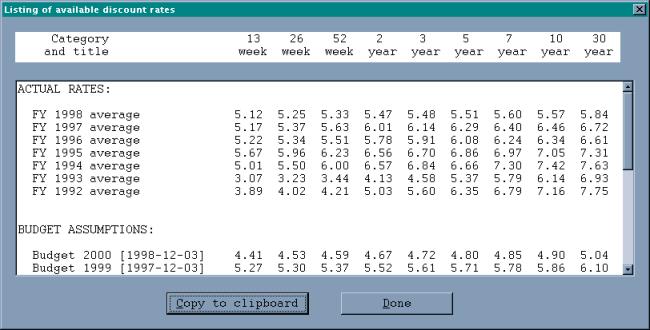
The rate selection dialog box also contains a button that enables you to view all of the available rates (View all rates...). This option is useful if you want to visually compare alternative rates. You can also copy the rates to word processing and spreadsheet software by clicking the “Copy to clipboard” button.
In addition to the rate selection tools listed above, the CSC provides you with a tool to calculate the borrower’s interest rate that would result in a financing subsidy of zero. The tool can be accessed by clicking “Zero subsidy rate” in the rate selection dialog box. To calculate an accurate rate you need to match the “input specifications” with the type of loan you are modeling. If your cash flows represent an amortized loan (constant payments with time varying interest and principal amounts), activate the “Amortized over life of loan” toggle box. If your cash flows represent a loan with a single principal payment along with the final interest payment, activate the “Balloon payment” toggle box. You will also need to set the term of the loan (in years) and the payment frequency.
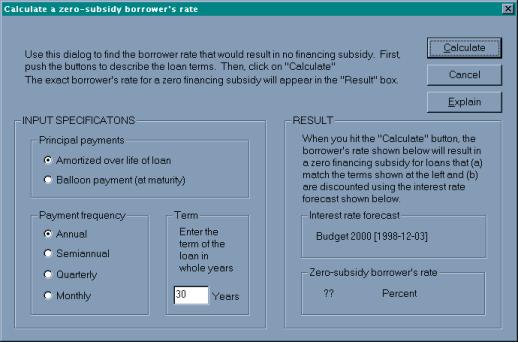
When you have correctly specified the loan, click the “Calculate” button. The “Result” section will report the zero-subsidy borrower’s rate as well as the interest rate forecast that it is based on. You can use this resulting interest rate to recalculate principal and interest payments in your cash flow spreadsheet. Note that the zero subsidy rate is only accurate for loans in which the borrower pays a constant rate, over a fixed term, and with payments of principal conforming to regular amortization or a final “balloon” payment.
III. Batch Preferences
The Credit Subsidy Calculator can be used from the DOS command line in much the same way as the previous release. Most of the commands used with the previous release will work with this release. In addition, some new output formats have been added.
A. Commands to print output
Each of these commands will send output to the default printer:
CSC sheet range
CSC sheet range cat sel
CSC print sheet range
CSC print sheet range cat sel
Where:
CSC refers to the executable file for the credit subsidy calculator. It may need a full path name (e.g., c:\myfiles\prog\csc) if the directory used to install the CSC is not on the DOS “path”.
sheet refers to a spreadsheet file with cash flow estimates.
range refers to the named range in the spreadsheet that identifies where, within the spreadsheet, the cash flow observations may be found.
cat refers to a category of interest rate assumptions. This must be one of the following: BUDGET, ACTUAL, or OWN.
sel refers to the selection within the category of interest rate assumptions. This selection must be among the rates shown in the rate selection dialog box in the CSC.
print is the word PRINT.
Explanation:
The first command will use the default interest rate assumptions, based
on the choices made under "select rates" and "conflict resolution" in the
preferences dialog.
The second command will use the interest rate assumptions you specify with
the category and selection.
The third command produces the same result as the first.
The fourth command produces the same result as the second.
B. Commands to save output from a single run to a file
Each of these commands will send output to a file. Any previously existing data in the file will be lost.
CSC file name sheet range
CSC file name sheet range cat sel
CSC import name sheet range
CSC import name sheet range cat sel
Where:
CSC refers to the executable file for the credit subsidy calculator. It may need a full path name (e.g., c:\myfiles\prog\csc) if the directory used to install the CSC is not on the DOS “path”.
sheet refers to a spreadsheet file with cash flow estimates.
range refers to the named range in the spreadsheet that identifies where, within the spreadsheet, the cash flow observations may be found.
cat refers to a category of interest rate assumptions. This must be one of the following: BUDGET, ACTUAL, or OWN.
sel refers to the selection within the category of interest rate assumptions. This selection must be among the rates shown in the rate selection dialog box in the CSC.
file is the word “file” and directs the CSC to create output in a printable format in the filename given.
import is the word “import” and directs the CSC to create output in “file import” or “space delimited” format in the filename given.
name is the output filename.
Explanation:
The first command will use the default interest rate assumptions, based on the choices made under "select rates" and "conflict resolution" in the preferences dialog. Output will be in printable format and placed in the filename provided.
The second command will use the interest rate assumptions you specify with the category and selection. Output as above.
The third command will use the default interest rate assumptions, based on the choices made under "select rates" and "conflict resolution" in the preferences dialog. Output will be in “file import” or “space delimited” and placed in the filename provided.
The second command will use the interest rate assumptions you specify with the category and selection. Output as above (third command).
C. Commands to save output from multiple runs to a file
Each of these commands will send one line of output for each cohort to a file. Data will be appended to the end of the file. Previously existing data will not be lost. You may use this option to accumulate output from multiple executions of the CSC.
CSC log name sheet range
CSC log name sheet range cat sel
Where:
CSC refers to the executable file for the credit subsidy calculator. It may need a full path name (e.g., c:\myfiles\prog\csc) if the directory used to install the CSC is not on the DOS “path”.
sheet refers to a spreadsheet file with cash flow estimates.
range refers to the named range in the spreadsheet that identifies where, within the spreadsheet, the cash flow observations may be found.
cat refers to a category of interest rate assumptions. This must be one of the following: BUDGET, ACTUAL, or OWN.
sel refers to the selection within the category of interest rate assumptions. This selection must be among the rates shown in the rate selection dialog box in the CSC.
log is the word “log” and directs the CSC to append output in a “file import” or “space delimited” format in the filename given.
name is the output filename.
Explanation:
The first command will use the default interest rate assumptions, based on the choices made under "select rates" and "conflict resolution" in the preferences dialog. Output will be appended to the filename provided in “file import” or “space delimited.” Output will consist of one line per cohort.
The second command will use the interest rate assumptions you specify with the category and selection. Output as above.
D. Commands to save output in a spreadsheet
Each of these commands will send one line of output for each cohort to a file. Data will be appended to the end of the file. Previously existing data will not be lost. You may use this option to accumulate output from multiple executions of the CSC.
CSC wk3 name sheet range
CSC wk3 name sheet range cat sel
Where:
CSC refers to the executable file for the credit subsidy calculator. It may need a full path name (e.g., c:\myfiles\prog\csc) if the directory used to install the CSC is not on the DOS “path”.
sheet refers to a spreadsheet file with cash flow estimates.
range refers to the named range in the spreadsheet that identifies where, within the spreadsheet, the cash flow observations may be found.
cat refers to a category of interest rate assumptions. This must be one of the following: BUDGET, ACTUAL, or OWN.
sel refers to the selection within the category of interest rate assumptions. This selection must be among the rates shown in the rate selection dialog box in the CSC.
wk3 is the word “log” and directs the CSC to append output in a “file import” or “space delimited” format in the filename given.
name is the output filename.
Explanation:
The first command will use the default interest rate assumptions, based on the choices made under "select rates" and "conflict resolution" in the preferences dialog. Output will be written in spreadsheet format to the filename provided. The filename must have a “wk3” extension. The output will consist of up to seven sheets, corresponding to the seven on-line views of the cashflow inputs and subsidy calculations.
The second command will use the interest rate assumptions you specify with the category and selection. Output as above.
IV. Online Help
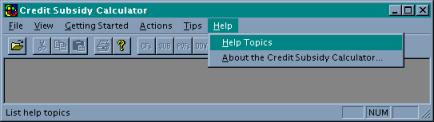
The CSC contains an online help section that can be activated by clicking “Help, Help Topics...” on the toolbar.
The help file contains five main books:
1.
Questions and
Answers
Discussion of common questions about the calculator, cash flows and differences between the old and new calculators.
2.
How to Organize Cash
Flow Estimates in a Spreadsheet
Discussion of how cash flow estimates should be organized in a spreadsheet, including discussions of keywords and timing. Includes examples of direct loan and loan guarantee spreadsheets.
3.
How the Subsidy and
Its Components are Derived from Cash Flow Observations
Discussion of interest, fee, default, and other subsidy components and the total subsidy rate and how they are derived from a given set of cash flows.
4.
The Derivation of
Present Value Factors from the Yield Curve
A mathematically intensive discussion of the yield curve and the derivation methods employed by the calculator.
5.
How the Single
Effective Rate is Calculated
Discussion of the algorithm involved in determining the single effective rate.
6.
Performing Reestimates with the revised Credit Subsidy
Calculator
Discussion of how to perform reestimate calculations using the CSC.
To assist you, each book mentioned above contains several “chapters” that will be displayed within the help window. The help file is also fully searchable through a topic “index” and the help file “find” feature.
[1] The file “rates.txt” contains actual and Budget interest rates. This file is placed on your hard drive during installation. OMB will supply interest rate updates on a regular basis via the Internet and floppy disk.